Monday, 31 December 2012

The views from my window


I live on a hill overlooking the sea, everyday the vista is amazing, from the brightest blues to the softest grey's.

I try to capture its magic, although never quite.

These are some of my photos with my new camera.


The white Agapanthus against the blue sea


The Grey evening I love this view when the sky takes on the soft pink


The evening sky


The first sunrise of 2013


The first sunrise of the new year, from the first city in the world to see the sun, this one taken by my husband.


Monday, 11 June 2012

Sock Babies


Sock Babies 


 These little sock babies were shown to me by a friend at my craft group, we all had a go at making them, so much fun.


You need two socks one white and one patterned, I used 2 to 4 year old ones but you can use 18 month size as well.


The blue ones my favorite, but they are all cute. You can click on the photo to see the face detail, its very basic.


 Cut the toe off the white sock this is your head.


 Cut the patterned one like I've shown. These were sweet socks with a lovely picot edge which will become the turn up of the hat.


The toe of the patterned sock becomes the body, you need to stuff it firmly, you can sew down to form the legs by machine or hand, I did this by machine. Make sure the stuffing is pushed down into the toes. Stuff the white head quite firmly, don't worry if these two pieces look round you can shape them later. Thread a needle with double thread and large knot, run a running stitch around the top outer edge of both pieces and pull tight, poke the raw edges under and sew hole up. If you want to add a bell or rattle maker now's the time to put it in the stuffing.


Sew head to body using a ladder stitch


This is the hat which is the ankle part of the patterned sock, see the photo of the cuts, its about 2 inches long
Run a gathering stitch around the raw edge, pull tight and poke edges under and sew shut like you did with body and head.


To form the arms pinch the body and start at the neck and sew down till it looks right making sure the shoulder is thicker than the hand end. I hope that makes sense, he looks like his hands are in his pocket.


Sew the hat on using ladder stitch, just in and out, I turned up the edge to make a cuff.


Add a little face, I embroidered mine but you can draw it, and a scarf or ruffle and a pompom on the hat and its all finished. Don't think it sounds complicated it isn't, have a go, they really are rather cute.

I have just had a retrospective look at this post, my apologies for my poor photos, I have learnt since then anyway they are still a fun project.

You may also be interested in my other Free tutorial a little dolls Carry cot              
  DOLLY'S CARRYCOT TUTORIAL
Happy sewing 
Glenis


Wednesday, 6 June 2012

Upholstered headboard


 This was a big job to make this headboard, I had to work it out by my self as I had not discovered Pinterest at this stage and didn't think to photograph the stages.  We decided to make it from Pinex, its a soft board that is light and we were able to push a needle through while buttoning it. We layered the board, foam rubber and quilters batting and then the fabric.


 The fabric needs to be pulled very firm and measured carefully as the piping has to run right on the edge. You can click on the photo to get more detail.


Its all stapled to the back  and then you need to measure for your buttons, with a very strong needle and linen thread and with the help of pliers you can do it.


 We chose the Pinex because we wanted to stick  it to the wall with 3 M velcro strips, my Husband didn't want any holes in the wall.  I'd love to tell you it was a great success, but it was not, woke one morning and the whole thing had slipped off so we had to go back to the drawing board.   Legs was the answer, supported the weight, seems to have worked, its still up there.


You can see the piping detail, it is so important to get this as perfect as you can.


Oh yes one more thing, make sure the weave on the fabric buttons runs the same way as fabric on the headboard.


Tuesday, 5 June 2012

Saxon's quilt.

Saxon's Quilt


 I have finally finished this quilt for my grandson,  although I did start it a year ago, I'm so pleased with it I think its such  fun so bright and bold, just like him.


The colours are vibrant, all the animals make it an  'I Spy quilt.'


 I bought the fabric on my last visit to Australia at an amazing craft shop in Hervey Bay where my Sister-in-law works. Each square is made up of five pieces, the animal fabric I cut up and then incorporated with the other fabrics.


I'm not really a quilt maker but have made a few for Grandies and friends.  You can click on the photos to get a better view.

I just used a simple binding


I like to do everything by machine if I can


Tuesday, 8 May 2012

Up marketing with tulle flowers

Make the lovely tulle flowers.


Back them with felt and string them together.


Now sew them around the neck line, looks great now and gone from an $80 to more, well I think so.


Another use for fabric flowers  [ thanks pinterest.]    This is a top that I bought unfortunately it was too low, so fabric flowers to the rescue.   It looks really great.


Monday, 7 May 2012

Tags my effort


 Having seen and pinned so many Tag ideas, I was keen to make a few.


 I had so much fun, having sewn most of my life I have a good supply of fabric and lace.


Smocking for Grandies


This is some of my smocking, I made this wee dress for my lovely friends first Grand child.  I have always loved sewing for children.


     This romper suit was for my grandson, he looked gorgeous in it.


See the details sailor buttons and smocked boats.


   The blue is so sweet, I love to do the piping it always finishes off a garment.                                            


This is the little suit I made for his Christening, I used white Viyella and smocked in cream and pale fawn threads.   The photos are not clear he never sits still.                                  


Saturday, 14 April 2012

The power of paint and using what you have.

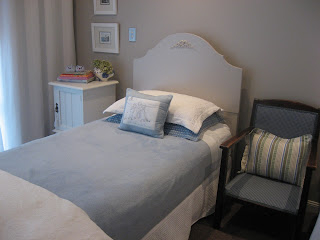
This is the room I made for my Grandchildren.


The bed heads were very old so I painted them the same shade as the walls but in Oil based satin paint, they blend but still look good.
I recovered chairs and made cushions.
 I kept the drapes plain, white linen, we have big views so things need to be simple.


 The bed linen is mail order, white with an embossed pattern and pale blue micro fiber blankets, all wash well.


 Other furniture got painted too, its looks white but I always use just a  hint of cream.


Before I painted the headboards I glued on rubber molding, cost just a few dollars but makes big dollar impact.


I embroidered these fun cushions and it was finished.


I love blue and white, it suits seaside homes and have tried to have some blue and also green in most rooms.

Sock monkey

Whats there to say, I have wanted to make this for a while.


I saw them being made about a year ago at a craft day and thought how cute, so finally here is mine.


 I just gave him to my Grand daughter at her Dedication this morning, he will never look this good again, but will be well dribbled on.   Bless her.


Another one.

Sunday, 1 April 2012

Wax paper flowers

 Having Pinned this idea from  nicepackageblog.com I was inspired to try it out, very easy and so lovely.


So simple

Just placed on a white linen runner

The wax catches the light, they look candle like


We were having a few friends over for diner, I had no fresh flowers, so out came my wax paper ones.
 They looked great.


Related Posts Plugin for WordPress, Blogger...