Showing posts with label free pattern. Show all posts

Thursday, 30 June 2022

Dolls Moses basket free tutorial, Lilly Mouse or Teen Doll size carrycot

 Small sized doll carry basket 14'' or 35 cm length

I always call these carry baskets 'carrycots' but Moses basket is more universal... anyway to carry a precious dolly any name will do.

I have written this as a free tutorial using pre-quilted fabric which I found at Spotlight Australia but most fabric type stores should have it.


 I have a digital version of this pattern for sale in my ETSY shop if your prefer a downloadable version. It's basically the same but includes dimensions and instructions for pillow and quilt.

Most of my 8 granddaughters have at some stage owned and played with barbie dolls but I like to give them a sweeter option...soft toys and hand made by me.
Lilly Mouse pattern is also in my ETSY SHOP with lots of other cute sewing projects.

Happy sewing 


Glenis


Wednesday, 17 June 2020

'Heart' applique and embroidery fabric coasters and Place mat ... free pattern

'Heart' fabric coasters and place mat...free tutorial


 There is a huge amount of work in producing a pattern so when you the buyer purchases it all the work, the measurements, and thinking are done for you.
I buy patterns even though I know I probably could work it all out for myself...but I don't want to and because it's good to support other crafty women like me and I want to try something new.
But what I'm noticing is that most of the instructions include diagrams to follow rather than pics.
So...I have been teaching myself graphics to help with my pattern making business. I generally take multitudes of photos to help with my step by step instructions... but sometimes the photos are blurred ( a bit like some of my photos here ) or the light is wrong and then you need to start from the beginning again...very frustrating.
I've written this tutorial so you can make these sweet coasters and place-mats but the template and text can be used in many other projects like my fussy cut purse, so I hope you enjoy and take the time to make something from it.
 If I could put a free pattern on Etsy I would but it doesn't work and I don't have the knowledge to put a downloadable file for this tutorial here but if you click on each numbered page below and save image and download them they will be true to size.
Happy sewing
Glenis


Sunday, 15 September 2019

Sew a gorgeous baby's bib..free pattern

Sewing bibs

One of the most appreciated gifts for a new mum other than a helping hand is a bundle of bibs. I have made quite a few in my time as a seamstress Grandmother of nine...almost ten and you know I really love making them.
This pattern I'm sharing is similar to my original pattern but with a snap fastener rather than a tie.


At the bottom of this post you will find the templates for this bib, Just copy them they are jpeg ...print out on A4 paper.


You can keep this bib simple or as glamed up as you like. You can check out other bib tutorials I've made HERE and pics HERE.
I have used some sweet floral and stripe just left over fabric from other projects, a lace trim, a little me made patch and quilting detail.


Cut out your upper and lower front pieces, add lace if you want and place the lower piece on top of the upper piece right sides together and straight edges aligned, stitch together using just over a quarter inch seam.


Pin together the upper and lower pattern pieces lining up the dotted lines..see photo above. Use this pinned together template to cut the backing fabric and the batting. (Just a note this bib doesn't need to be quilted and can just be backed with terry toweling or any absorbent fabric, but if you quilt it the quilting process makes the bib smaller and so you might like place the quilted bib front on the backing fabric and use that as your template.)
I used a fusible batting but a lightweight cotton batting would be equally as good.
Press the seams up and the lace down on the front bib and using a cover cloth press the batting in place on the wrong side of the bib.
At this stage I have quilted my front in a diagonal grid about 1 '' apart. I recommend using a walking foot to get the best job.


Trim the threads and if you want to add a little patch or label now's the time.


To assemble the bib place the back piece on top of the front piece RST and stitch around the edges using a small seam, leave a 3'' gap on one side of the bib for turning through. Trim the seams where necessary and clip carefully at the curves.  Use a chop stick or similar to turn through, push out all the edges with your implement to get a nice shape and all your curves smooth. Press well and hand stitch or fabric glue up the opening. Add a snap fastener or small Velcro circles to close your bib...all finished.


 Happy sewing everyone.

Glenis

Thursday, 2 February 2017

Lamb Softies, toy lambs in pyjamas


Lamb's in pyjamas.. featured in February's Homespun Magazine

I was delighted to see these wee fellows in print at last, you know they had to jet their way to Sydney and back!!


I've used flannelette and cream fleece to make them, keeping them soft and cuddly, I always try to keep my patterns simple while still retaining the detail that I love. 


They even have their own hotties, and look I've added a little buttoned flap to the back of his pyjamas..fun ah!!

Just to let you know you can buy a digital copy of this magazine from Zinio, but there is nothing like holding the real thing in your hands.
I love this Homespun Magazine it's filled with amazing projects, such talented global craftswomen.

Well happy sewing everyone and don't forget all my other patterns are available here.

Glenis


Monday, 5 September 2016

The DOLLY SISTERS.. soft toy for Homespun Magazine

The Dolly Sisters

Some great opportunities have come my way this year but to have a pattern published is such an honor.
Almost a year ago I was contacted by Susan the editor of 'Homespun Magazine' to see if I would like to design a Doll for them.... this was so exciting for me.
Much thought was needed to design something reasonably simple but still appealing.

These are the 'Dolly Sisters', sweet simple little dolls with bright button eyes.


I loved designing this doll, putting in sweet features that bring the face alive.


The little headscarf with it's flowered trim, freckles anyone....just French knots, buttons for eyes and simple stitching gives her just the right look.


The little skirt has a inserted border just to add interest, frilled sleeves and a petite collar just finishes her off.


Homespun is a great Australian craft magazine with a pull out section containing all the patterns, it has a global feel with talented crafts people from around the world contributing to it's success.
 I do feel privileged to be part of this and I was truly ever so grateful to be asked.

I do believe you can order it online from Zinio.

Happy sewing

Glenis


Monday, 6 June 2016

Baby's Bibs- free pattern


Simple...A Baby's Bib sewing pattern


I like to sometimes have simple projects that can be quickly made and these Bibs are one of them. I make several at once, spend an hour or two and you can make probably six.


Two contrasting fabrics and backed with cotton Waffle easy and almost completely bagged out making such a quick project.
I bind the neck with bought bias tape leaving long ends to form the ties. No Velcro to tangle and catch in baby's hair or in their clothes, just old fashioned and simple.


Having the two contrasting fabrics on the front makes for sweet looking bibs and fabric friendly.
Join the bib front and bottoms together, press open the seams and top stitch.


 I back them with cotton waffle it washes well and is absorbent enough to catch all the dribbles.
Place the waffle back bib over the front with right sides facing and sew around the stitching line as shown on your pattern piece, clip the corners, turn through and press.


Cut a piece of the bias tape 25'' in length, position the middle of the tape on the centre of the neck edge.
Pin then sew carefully so you catch the back of the tape, continue to stitch through to the ends of the bias to create the ties, I tie a little knot at the ends of the bias tape.


See just as neat on the reverse.


I have added a little ribbon tag to create detail but there are endless possibilities, frills, lace, ricrac etc.
Over the years I have made dozens of these bibs, simple yes and sweet.


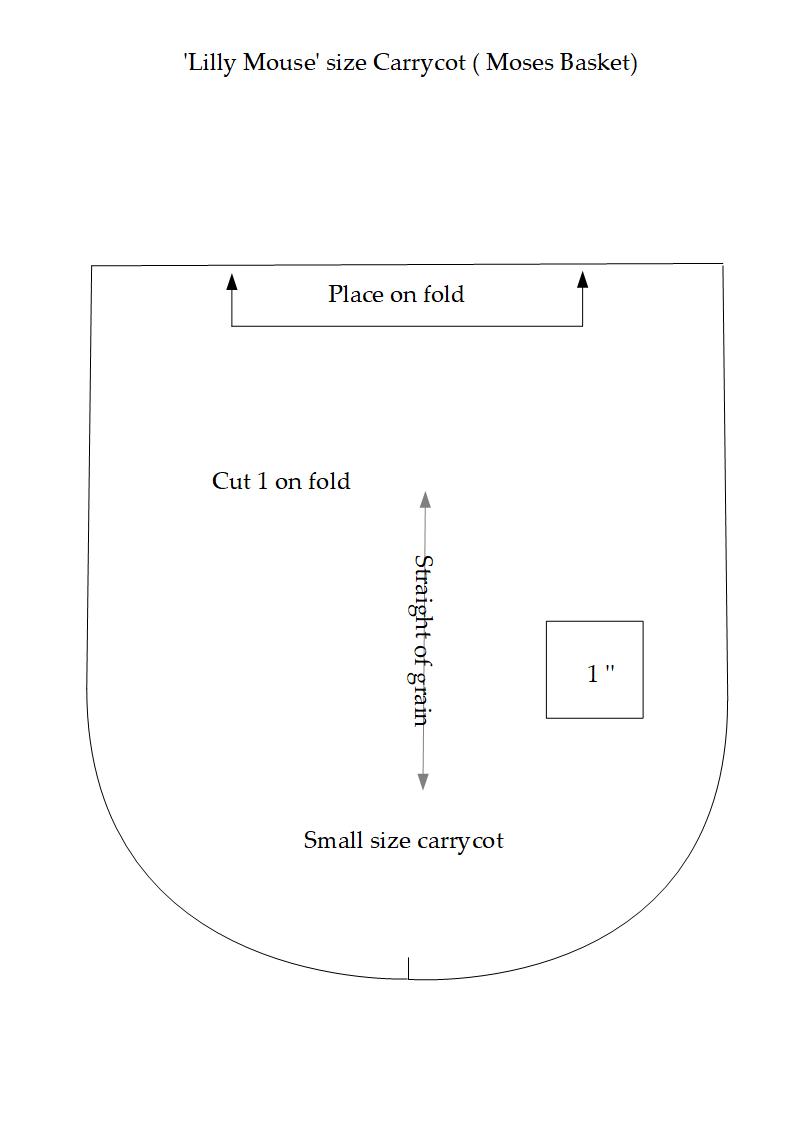
Copy the pattern pieces page 1 and 2 and print out on A4 paper, I have put an inch square so you can get your sizing right although it won't matter if they are a little smaller. 


Happy sewing
Glenis


Related Posts Plugin for WordPress, Blogger...